Wednesday, December 31, 2014

WISH YOU ALL A


And as you make your New Year resolutions for 2015
remember
:
:
If you don't know where you are going,
You might end up someplace else.
Yogi Berra


Monday, December 29, 2014

Block of the Month


I've become quite fond of a few FB Groups.  When you do most of your quilts by hand, you have to search out kindred spirits. The FB Groups provide me with quilters that have something in common with me.   Quilters are indeed on the rise, but hand work is still a small minority. I've joined a number of groups that are strictly for hand working quilters; but I've also joined several groups that are not exclusively hand work but are at least excepting of quilters who work by hand. 

One of these groups, Quilters Block of the Month is not all hand piecers and maybe not any but I like the group and the challenge of making at least one block a month is fun  The blocks the group presents come from Quilters Cache.   The group has divided the BOM into Easy, Intermediate, and Advanced.  They have also presented a number of alternate blocks. I'm hand piecing the blocks....no surprise here.

First I recreated the blocks on EQ7 and played with the colors.  It also gave me a better understanding of the pieces I needed to make the block.

Then I checked out  Cathi's List  on Inklingo.  This gave me the collections I would need to make this block with Inklingo.

From there I then printed the shapes I needed and hand pieced them together. 

Each block is 12 inch square.  The first block I prepared is called Four Winds (an alternate block on the FB Group) by the people at Quilter's Cache.  The block was easily broken up into 2 inch sections.  I used Inklingo Collections that I already owned.  If you wish to do this block you will need 2 inch half square triangles and 2 inch squares. 

The photo directly below shows my string piecing process.  String piecing makes hand piecing go faster, just as string piecing moves things along when you are machine piecing.  Down in the bottom left corner of the photo you can see a print out of my EQ7 rendition of the block. I needed this to follow the block pattern.


Four Winds Process of Piecing
Here is the finished block.


Four Winds Block Finished


This first block went so quickly that I decided to piece the January Block as well.  Named Arrowheads by Quilter's Cache, this block can also be divided into sections that are found in various Inklingo Collections.


Arrowheads Block Finished
Rotation Spinning Counter Clockwise

The Quilter's Cache block spins clockwise.  I made mine spinning counter clockwise.

The Arrowheads block is made of 1.5 inch squares, 3 inch triangles, 1.5 inch triangles. and 2.12 inch triangles.  If you want to piece this block using Inklingo, head off to Cathi's List for the collections you will need.

I plan to make the rest of the blocks using this same method so I spent time recreating the blocks in EQ7 so that I can continue to play with color way and possible changes.  Love EQ really because it allows for so much creativity. I love Inklingo because it allows me to piece with ease and accuracy.


Sunday, December 21, 2014

My Celtic Solstice

My pick of color way in the center

Last year in November, I began Celtic Solstice, a mystery quilt created by Bonnie Hunter.  Linda Franz - Inklingo - hooked up with Bonnie Hunter and created a Celtic Solstice Shape Collection.  Bonnie Hunter had a color way picked.  Linda choose another, and I had so many scraps of blue, I chose a blue color way with neutrals of light gray and cream.  Using Inklingo, I printed out my pieces.

I put the clues together...there were 5 of them and then the reveal....clue 6. Inklingo made the process a pleasure.  I must admit I took my time.  I kept getting distracted by other quilt projects.  I'm hand piecing so I took it up as the mood struck me.  I mostly stitched the pieces while I watched a TV program, or when I gathered with quilt friends.  Sometimes I sat and stitched and thought about this and that.

The thing about hand piecing is that you can do that.  You're not sitting in front of a sewing machine in your sewing room.  (Although sometimes that can be fun too.)  You can hand piece anywhere.  So time with this project was like no time at all, because while I put this quilt top together,  I was always doing something else.

Clue One  String Piecing
The photo above shows one of my string pieced sets on my lap desk.  As I finished my clues, I put the sets into zip lock bags.


Clue One Pieced and stored into zip lock bags 
Clue Three
 
I continued on with all the clues and then began to put all the blocks together.

I've now hand pieced all the blocks and I'm assembling the quilt top.  My plan is to put blocks together in 4 block sections, then piece these sections together for the quilt center. 

Four Block Section
When I looked at the sets as I was assembling them, I thought they were kind of dull looking but now that I've put some of the blocks together, I think it sort of sparkles. Sometimes, using your scraps works out.   Maybe this quilt will look good.  I'll wait and see.  Not too long before the entire quilt top is assembled.   I'm not very good at finishing quilts of this size.  (75" x 75")   My quilt buddies think I should hand quilt it.   Let's face it.  This may take a while

As I said,  I get distracted.  Smiley

Tuesday, December 16, 2014

SIXTEEN PATCH SCRAP QUILT

Sixteen Patch Scrap Quilt 64" x  64"
My goal in life is to use up my bits of scrap fabric that I have accumulated over the years. To that end,  I created a 16 patch with the EQ7.  Each piece is 2 inches square and each block is 8 inches square.  Each  block has a variety of one color way.  For example the pink block has 10 to 12 different pinks.  So depending on your own stash of scraps, the pinks would vary as would the blues, greens, yellows, oranges, and reds.   I didn't put in a large border.  The border in this quilt is just .05 inches.

In the example above, the quilt would be 64" x 64".  Perhaps I would have a  more useful quilt if it were a bit longer.  The example below is 65" x 72".

Sixteen Patch Scrap Quilt 65" x 72" 
 I like this arrangement of blocks but as I make the blocks, I might rearrange them.  Maybe I'll come up with another border.  I kind of like the look of the tiny border.  Here's a possible plain border.

Sixteen Patch with plain border
Any opinions are welcome.  I'm leaning toward no border. Too much border would take away from the twinkle of the quilt.   The happy thing is, I don't have to decide right now.  I have a ways to go before this quilt will be finished.

I'm hand piecing using  2 inch squares from Inklingo .  If you follow this link and click on Cathi's PDF Version of the Index of Shapes (Thank you Cathi!)  It lists all the collections with 2 inch squares. I count 8 collections.  I have several.  The One inch 90 Degree Hexagon Collection (Patchwork of the Crosses) has this 2 inch square. I could use this one.  One of the things  I love so much about Inklingo is that if you have a shape collection, you can use that collection to make so many other quilts.  (Thank you Linda!)

This quilt could also be made as a little wall hanging or table topper.  If you made your squares 1 inch x 1 inch, the quilt would be about 32" x 32".  What fun that would be!  Take a look at Cathi's List for all the collections that have a 1 Inch square. I count 7 collections.

As I start this project, which will be my go to in between other projects, I'll post more about my progress.  I expect this to take some time because I'll be hand piecing the quilt and eventually hand quilting it.  For all those who prefer and can get accuracy with machine piecing, this will take a lot less time.  Inklingo is also very useful for machine piecers.  I can see you all whipping through this, string piecing it, and making short work of it.

Sunday, December 7, 2014

Around the World Blog Hop

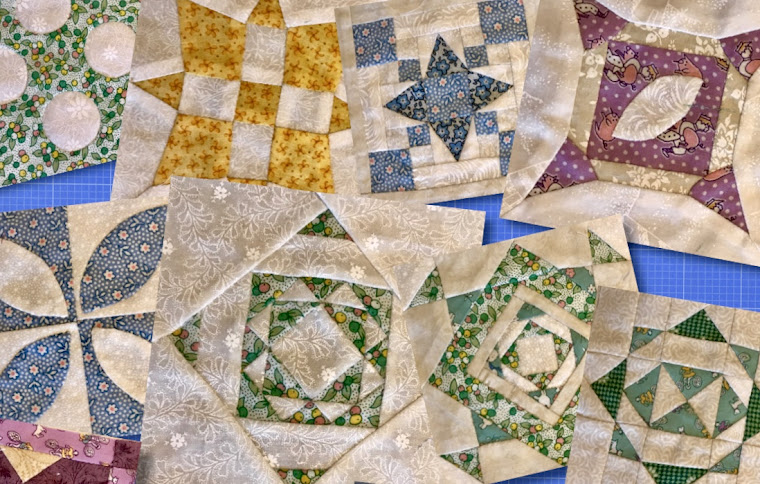
Miniature Patchwork of the Crosses

I've been invited to participate in an Around the World Blog Hop by Carol at Postcards from Panama and as promised last week, here I am to answer some questions about myself and my blog.

WHAT AM I WORKING ON

Well currently, I'm working on several projects at once because I can't stay focused on one project at a time.  I'm thinking that makes me unusual. Many or most of my quilt buddies actually finish the projects they start, but I find my follow through lacking.  Not that I haven't finished a great number of projects but let us just say my UFO's are still numerous.  Please visit my blog QUILT FINISHES to view some of my finished quilts.

Most recently, within the last year anyway, I've been focusing on hand piecing my quilts. I've always liked hand piecing, but found the process difficult in the preparation.  Using templates to cut and marking my sewing lines was not fun for me.  I reviewed various ways of doing what I needed to do to get to the actual piecing part like the Jinny Beyer method or using EQ (Electric Quilt Software) to print templates out on freezer paper or directly onto fabric.  I found these methods wanting.

Then I ran across Linda Franz and Inklingo and it all fell into place for me.  Now, at least for the present, I'm focused on hand piecing.  There are so many possibilities with Linda's method.   I find myself wanting to try it all and have trouble staying focused on just one.

 So here are some of the projects  I'm working on.

1. A miniature POTC (shown above).  This top was completed using Inklingo 0.5 Inch 90 Degree Hexagon Collection.  I still need to put a border on it and quilt it. 

2. A carpenters wheel in bright colors, yellows, neutrals, and whites.  I've pieced the blocks together but it still needs a border and quilting.  I'm stalled at the border because I can't decide thick border, thin border, no border.  Colors or neutrals or both.  I used Inklingo's free collection Diamond/Triangle/Square for this quilt top. 

Carpenter's Wheel

The Carpenter's Wheel is one of my first Inklingo projects. I downloaded this shape collection to see if I liked Inklingo.  Well guess what?  I loved it.  It made hand piecing a joy - and big bonus, I could use up my scraps.  Using custom printing, I could print my shapes on my small pieces of fabric.

3.  Texas Tumbler:  I put this top together using Inklingo 1.0/2.0 Inch Star Points, 2 Inch 60 Degree Diamonds, and 60 Degree 1.0 Inch Hexagons.
I named this Texas Tumbler because it combines the Texas Star with Tumbling Blocks.
Texas Tumbler
My Texas Tumbler still needs some work.  I plan to add pieces to square up the sides, add some borders and then of course quilt it.  This was also made using my scraps of fabric.  Using scraps makes me happy.  I hate throwing small pieces out.

4.  Texas StarFish.  This is just about done.  I just need to bind it.  Follow the link to see how I did it. I named this Texas StarFish because the Texas Star blocks are kaleidoscoped using fish fabric.


Texas StarFish


I'm working on a number of other items.  I try to use Inklingo for all the designs I see and like.  My Prairies Women's Group is making little wall hangings.  I've done the following two using Inklingo shape collections and converting patterns to Inklingo. These two wall quilts/table toppers are almost done, just needing binding and quilting.  They are hand pieced and will be hand quilted.


This is not all I'm working on but in defference to those who read my blog, I'll leave this long list to other posts.


HOW DOES MY WORK DIFFER FROM OTHERS OF ITS GENRE

This is an interesting question.  I'm csurious to discover how many Quilt Genres there are.  There are art quilts, traditional quilts, modern quilts, pieced quilts both by hand and machine, applique quilts both by hand and machine, dimensional and flat; and then there are differences in how we quilters quilt our quilts.  We have machine quilting by domestic machines and long arm machines.  We have hand quilting either big stitch or regular stitch.  There are so many varieties.  I may have left some out.  In the hand piecing category some quilters use the English Paper Piecing method and some use the hand piecing using the running stitch method.

So where am I in all this.  I think of myself as a traditional quilter.  There are still some of us left, and our numbers are growing.  Among traditional quilters, I still differ because I do everything by hand.   I hand quilt, hand piece, hand embroider, and hand applique.   I love hand applique and pretty much stuck to this for the first number of years I quilted.  I hand quilt and I don't think there are nearly as many hand quilters as machine quilters.  From what I see many quilters will piece their top and not quilt it themselves, but send it off to a long arm quilter.  I have done that too, but most of my quilts are put together and quilted by hand.   I also like to create my own patterns.  Here are two of my early works both hand appliqued and hand quilted.

Anniversary Rose
Anniversary Rose was made for my Husband upon our 10th Anniversary.  I drew the pattern out on graph paper, transferred the pattern to my background fabric and hand appliqued the pieces down.

I named this quilt Chiroptera.

Chiroptera
From Wikipedia:
Bats are mammals of the order Chiroptera (/kˈrɒptərə/; from the Greek χείρ - cheir, "hand"[2] and πτερόν - pteron, "wing"[3]) whose forelimbs form webbed wings, making them the only mammals naturally capable of true and sustained flight.

I love bats and I think there will be more bat quilts in my future.  I created this quilt in October of 2000 from bits of scrap and pieced purchased hand died  pieces of fabric for the background.  It is hand appliqued and hand quilted.

There is a pocket for the label and I  printed a story of Chiroptera on fabric with my inkjet printer, heat set it, folded it and put it in the pocket.  The drawing on the pocket is my own. The photo of the printed story is blurry.  That's my camera and photography abilities.  The story is really clear to read.


   WHY DO I WRITE/CREATE

I write and create my quilts because I can't not write and create.  Does this make sense?  There isn't a day go by that I'm not doing some quilt work or some writing.  I blog because it gives me an outlet for my thoughts and keeps a record of my quilt work.  I quilt because for me, it is a creative outlet.  Quilt work is more than something I do, it is who I am.


HOW DOES MY WRITING/CREATING PROCESS WORK

Not sure....  It's just there in my mind and needs to be let out. If I don't let it out, I get brain fog.

I hope you did not find this blog too long to enjoy. I can tend to be long winded.

Finally, I would like to introduce you to our next Around the World Blogger.   Her name is Jayne and she has been a quilter for over 30 years.  Jayne is a retired English teacher (semi retired), a mother, and a grandmother.  Jayne's blog came to my attention, because like me, she loves hand piecing.  Please visit Jayne's blog Jayne's Quilting Room .  Click on the link and visit her now and on Monday, December 15 when she will be writing about what she is working on and her creative process.

Bye for now.  Thanks for stopping by and come back often.  Please leave comments.  I would love to hear from you.

Sandy White


Monday, December 1, 2014

Around the World Bog Hop

I've been asked to participate in an around the world blog hop.  Carol from PostcardsFromPanama
 has tagged my blog for next week, December 15.  Visit me then and I will post about

1. What am I working on?
2. How my work differs from others of its genre?
3. Why I write/create what I do?
4. How does my writing/creating process work? 


And I will link you to other bloggers.

Please come back for more on this next Monday December 15, 2014

Friday, November 21, 2014

Most recent Projects

It's cold here in NW Ohio.  I think we are in for an awful winter.  Even my GG Marie would rather be sitting by the fire.  Most days my little Chihuahua mix won't come inside the house.  Oh, she comes in if I ask her to.  She runs in to see what I want,  gives me a nose bump and a kiss and runs out again.  Today is different.  Today she's inside.  Temperature on the back yard thermometer showed 23 degrees F. this afternoon.  Even lower now.


For the last two days I've gotten very little hand piecing or any part of the quilt making process done.  Computer issues.  Or not really computer issues.  Pop up ad issues.  Malware Issues.  If I ruled the world, I'd exact my revenge.  Maybe sit these small minded people (who force these adds on the computing public) in a locked room and make them listen to elevator music all day.  That would be oh so nice...and satisfy my revenge quotient in part.  I have more evil revenge scenes rolling around in my thoughts but oh well never mind.

So now all is fixed and working as it should, but the last two days are a bust for my quilt work. Last two days aside,  I have managed to do some piecing and finished two little tops over the last month. 

The Patchwork of the Crosses in Red and White is a small table topper I made using the Inklingo 90 degree 0.5 Inch Hexagon Collection.   The last time I posted about this top, a quarter of the blocks were pieced together.

One Quarter of  POTC in Red and White
Patchwork of the Crosses in Red and White
Now it's done as far as I plan to go.  The blocks went together nicely.  My friends are encouraging me to add to this quilt top making it larger but I want to move on to something else. There are so many potential quilts running around in my head.

My Prairie Women's Group is working on an English Paper Piecing Hexagon Quilt using one inch hexagons.  I used to piece my hexagons the EPP way.  I did a few quilts using this method, but so combersome.  I think the reason EPP is used is for accuracy plus all those Y seams make a Hexagon Quilt Top difficult to machine piece. 

I hand pieced my top using Inklingo's One Inch Hexagon Collection .  Accuracy is a snap and there are no Y seam problems when you use Inklingo.  Lots quicker and a lot more enjoyable for me. So while the group is still working on their EPP, wrapping their little bits of fabric around their little one inch  hexagon shapes,  I have finished my top and I can move on to quilting it or maybe make another top.  The top does call for some wool applique on the light center hexagon flowers, but I will do this after I quilt the top...this can be easily done with hand applique.

Hexagon Quilt Top
Made with Inklingo 1 Inch 60 Degree Hexagon Collection


So what next?  With EQ7, I've created a Rainbow Quilt top using 2 inch squares.  I can hand piece this a bit at a time very easily using 2 inch squares from one of the Inklingo Collections.  I already have the 90 degree 1 inch hexagon collection.  The 2 inch square is a bonus piece in this collection.

Bonus Pieces in the 90 Degree 1 inch Hexagon Collection
Or, our Prairie Women's Group will be working on a flying geese wall quilt.  I'd like to try this with Linda Franz's method of machine piecing flying geese using Inklingo.   (Sewing Flying Geese the Inklingo Way)

And I recently became inthralled with Dresden Plates. Using Inklingo  Dresden Plate Fancy Pieced Collection, would make doing one of these quilts so much fun.

So many possibilities.  I don't see how some of my  fellow quilters can stick to just one quilt project at a time!

Thursday, October 23, 2014

Portable HP Printer and Custom Sizes


PRINTING CUSTOM SIZES ON AN HP PRINTER


Not long ago, I went searching for a laptop.  I need one when I go on little trips or vacations.  I have an IPad, which I love, but it has some limitations.  So I purchased a little lap top.  I weighs less than 2 lbs.

I also needed a small portable printer.  This would be great for travel and I thought I could use it to teach an up coming Inklingo class..... but as it turned out, I didn't get to it on class day....and that's another story.  So I purchased an HP Officejet 100 Mobile Printer because that's all they had in small printers.  I could have just not purchased any printer that day and gone on line to find something elsewhere ( I need custom sizes and HP wasn't likely to allow for it.) but I'm the impulse sort so I bought it.

HP Officejet 100 Mobile Printer
I took it home and all worked OK.  Putting in the cartridges proved a bit of a chore, but I got it print ready.  Custom sizes was grayed out just as I expected. (My old printer was an HP).. The printer comes with a little bit of instructions but even though it appeared to allow custom sizes, I couldn't figure it out just how I was expected to do it...so I went on line and up pops a number of possibilities... most of them from people asking the same questions I had with no good answers.  The best one I found after a Google search was for a totally different HP Printer, but it gave me enough information so I could work it out.  I can now print custom sizes on my HP.  I'm thinking if it worked for me, it may work for other Inklingo enthusiasts with HP Printers.

So HP owners who want to print custom sizes give this a try.


Let's say you would like to print 7" x 7"....

1. Go to the page you want to print...current page...actual size.
2.  Go to Properties then Features.
3.  Down in the middle of Features pick custom.
4.  At custom at the top of the page you will see the word custom...you will have to rename it...I'm printing a 7" x 7" sheet of triangles so I rename it Triangles 7 x 7.  Then click Save.  Click OK.
5.  You are now directed back to features.  Your size is displayed.  ( I would check "show preview before printing") Click OK.
6.  You are now back to your main print page and you have your correct size.

This is much more complicated then the Canon I use with my Desktop PC, but it's do-able.  So big smile here.  I can now take my printer on vacation or to class along with my little laptop and I'm all set to print out my Inklingo custom size pages.

Saturday, October 18, 2014

Hexagon Table Topper


Hexagon Table Topper
The Pioneer Women (I've mentioned before) meet once a month at Quilt Heaven (LQS) in Lambertville Michigan.  Some of our projects use English Paper Piecing.  I enjoyed English Paper Piecing at one time but once I started to use Inklingo I saw how much faster the projects got put together.  

 Allie's Garden from Cut Loose Press is an optional project.  Rather than follow the instructions, I looked at the project and saw that the pattern called for one inch hexagons.  Using Inklingo's 60 Degree One Inch Hexagons shape collection,   I put this  little project together while watching programs on TV with my hubby in the evening.  It came together very quickly.  The part that took the longest was choosing the colors from my stash.  The pattern calls for adding a row of hexagons after the colored hexagons and then cutting them off to make a straight edge.  With the One Inch 60 Degree Shape Collection, I could add half house hexagons all around.  


From Left to Right: From Linda Franz' Inklingo 60 degree 1 inch Hexagon Collection.
 One Inch Hexagon with the additional shapes
half house, other half hexagon, quarter corners, and third.

On each corner I added a half hexagon.  


Corner showing the use of Inklingo other half hexagon plus the colored strips
When I added the Hexagon other half to the corners, the size was large enough to allow for the use of strips.  I cut the strips 1 inch wide by 9 1/4 inch long and then drew my stitching lines in a quarter inch.  Worked beautifully.  I don't care for the idea of cutting off hexagons after sewing and I think those strips add that little extra touch of color.  


Embroidered Center
The center of the table topper is hand embroidered.  I used some hand dyed no. 12 embroidery thread that I've had around for over 10 years.  I think it came out too light.  If I do this topper again, I'll use a darker thread.  

Thursday, September 11, 2014

Autumn Pinwheels

Autumn Pinwheels - the quilt
Autumn Pinwheels - the block


Linda Franz posted on facebook today showing us a block from Quiltmaker Magazine 100 Blocks Volume 6.  It was called Pecking Order and was created by Laurie Baker.  Laurie made her block with scraps.  I called up my EQ7 and recreated the lines of the block so I could play with it for color arrangement and quilt possibilities.  This quilt is one of the color and block variations I came up with.  Look what can be done by just rearranging color!    I have dozens more.  This one is for fall.  It is totally do-able using Linda's HST Collection B (Which I have.)  You need 2 sizes from that collection (which has 12 sizes).  If the larger size is 2 inch then the smaller would be 1 inch.  You could use any size variation that you wish as long as the larger size is 2 times the smaller size.

Creating with Inklingo is just so much fun.  If you have the HST Collection B, you can make this quilt so easily by hand piecing or machine piecing.  I myself prefer hand piecing.  Now just to find the time.

Saturday, August 9, 2014

MY TREATS REVERSE APPLIQUÉ

In the 90's I started to put my sewing skills to quilting.  I enjoyed piecing and spent hours in my sewing room. Then I discovered Appliqué.  Back then there wasn't much machine appliqué.  That came later, so I was lucky to find people with hand appliqué skills to help me along.  I took classes from my local quilt shop and fell in love with the process.  So much can be done with hand appliqué. Like hand piecing, it's portable and social. Most recently, I discovered Dutch Treat by  Judy Garden.  A very inspiring book.  If you have an interest, it can be purchased on Amazon. The blocks are done in reverse appliqué.

I have this beautiful fabric. It's black with shots of green, red, white.  It has metallic silver shimmers.

Hoffman Winter Wishes
I love it but I don't have a lot of it.  I decided to make a small quilt using some of Judy Gardens Dutch Treat blocks.  I'll also make some blocks of my own.  Here's what I've done so far.

I'll continue to make these blocks until I run out of fabric.  I love the hexagon.  So many possibilities come to mind.


Tuesday, August 5, 2014

PATCHWORK OF THE CROSSES

LUCY BOSTON PATCHWORK OF THE CROSSES


PATCHWORK OF THE CROSSES SECTION IN RED/WHITE


Made with Inklingo 90 degree .5 inch Hexagon collection, these small hexagons would be impossible for me without Inklingo. The crosses are made with a red Thirties fabric I've had around for many years plus another small print red I've had around just as long. This will be a small quilt.  I've got no more of these red fabrics left. I've got enough pieces printed and cut for another 12 POTC Blocks.  I'm joining them with tan fabric that has tiny red leaves to match the red of the crosses. So this little project can't go very far but it's great practice for the next one.

A Single POTC Block made with 1/2 inch Hexagons
I am thoroughly enjoying working with these little pieces.  I'm having a lot of fun.

Thursday, July 24, 2014

Dear Jane Row A Continues


My Dear Jane Journey


I've finished all the blocks in Row A.  Here are photos of A-11 through A-13


A-11
A-12
A-13

This hand piecing continues to be quite satisfying

Below is a collage of all the blocks in A